System Data - User Admin Central
NOTE: Currently, User Admin Central is only available for Enterprise clients.
User Admin Central (UAC) is a centralized user management solution that gives you full control over onboarding, permissions, and seamless Azure integration all in one place.
With User Admin Central, you can create users manually on the User Maintenance screen or set up automatic provisioning through our CMiC Azure Sync program. Once your permission templates are in place, users are auto-created in CMiC as soon as they’re added to the Azure Sync Group. It’s that simple!
Requirements
-
System Setup: The necessary backend components have been included in Patch 20.
-
AZR License: An AZR license is required to enable Azure Sync and Onboarding Error Logging. Please contact your account manager for assistance in activating these features.
-
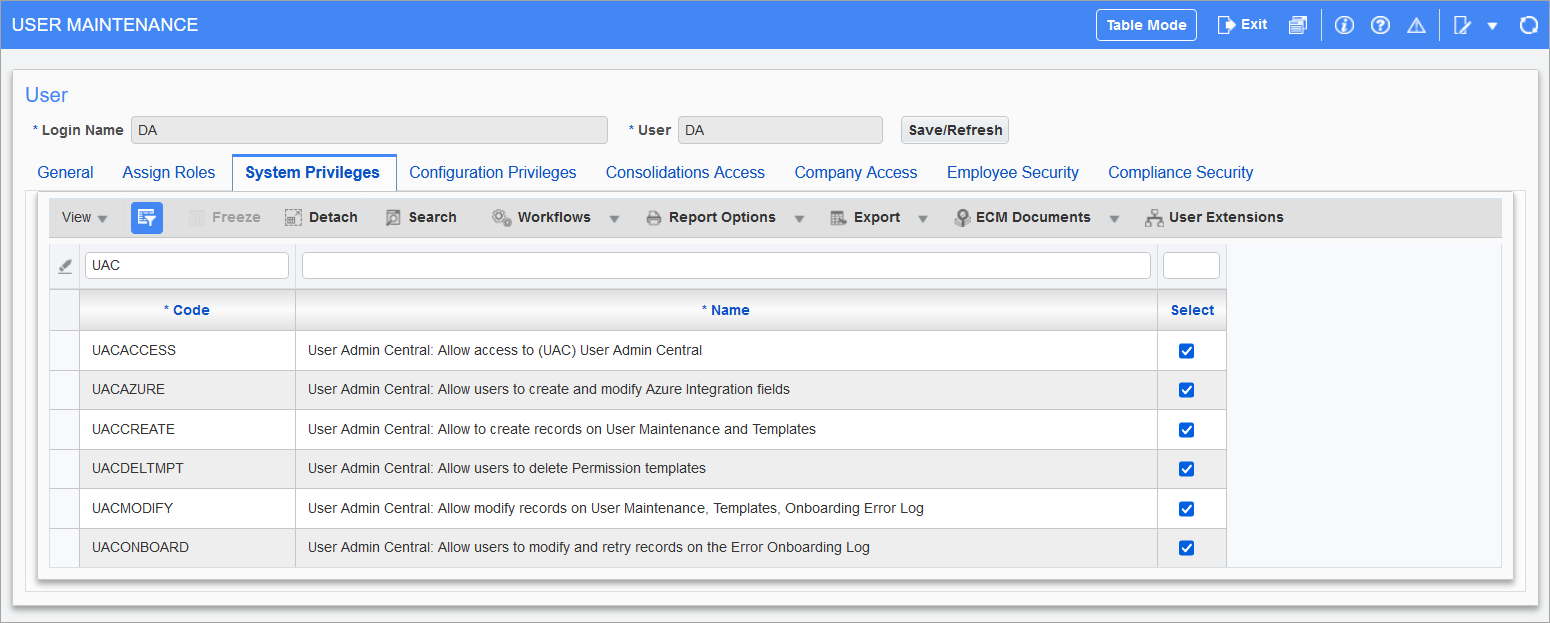
Admin Privileges: Ensure Admins have UACACCESS and role-specific privileges, such as UACDELTMPT for template management and UACAZURE for Azure settings access. The following describes the different privileges available:
-
UACACCESS - Allows access to User Admin Central (UAC)
-
UACAZURE - Allows users to create and modify Azure integration fields
-
UACCREATE - Allows users to create records on the User Maintenance and Permissions Templates tabs in UAC
-
UACDELTMPT - Allows users to delete Permission templates in UAC
-
UACMODIFY - Allows users to modify records on the User Maintenance, Permissions Templates, and Onboarding Error Log tabs in UAC
-
UACONBOARD - Allows users to modify and retry records on the Onboarding Error Log tab in UAC
-
API License: The System Data API License is required to run the CMiC-UAC-REST-API calls that the User Admin Central feature relies on. This license information appears in the API License Log (SDAPILICENSELOG) screen. For further details, please refer to System Data - API License Log.
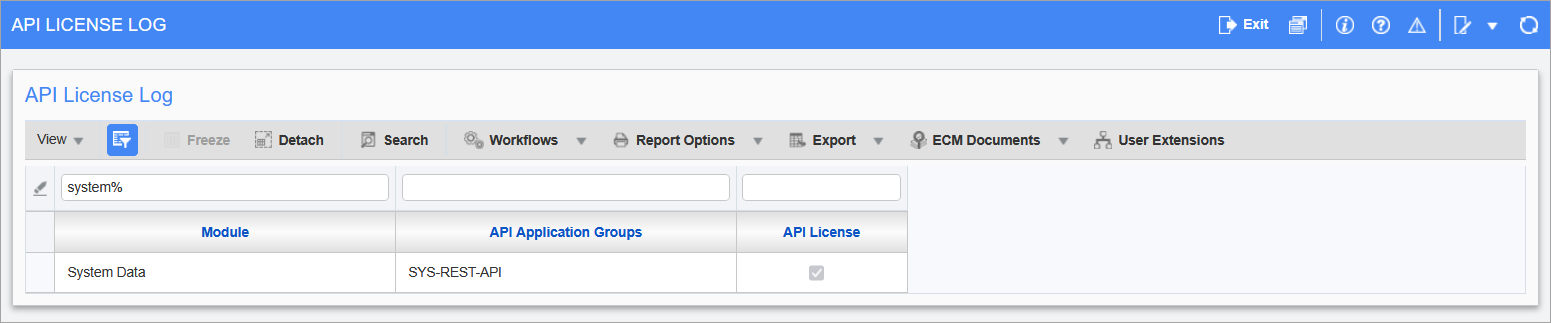
Pgm: SDAPILICENSELOG - API License Log; standard Treeview path: API Management > Logs > API License Log
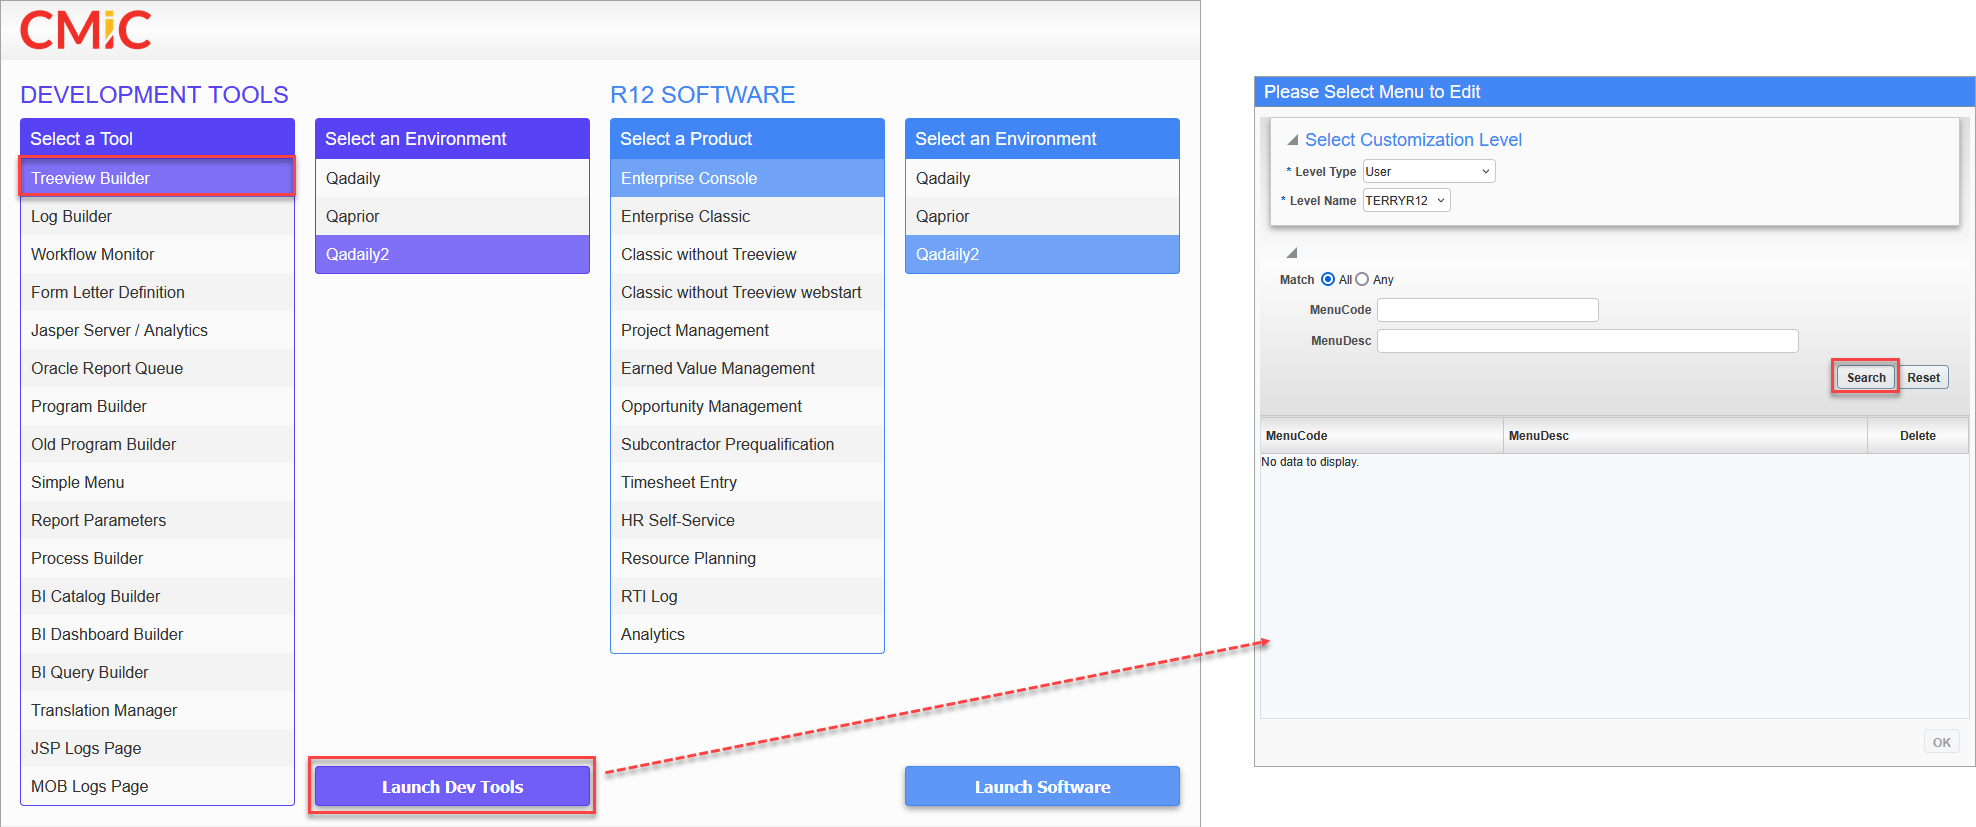
Adding UAC to the Treeview
-
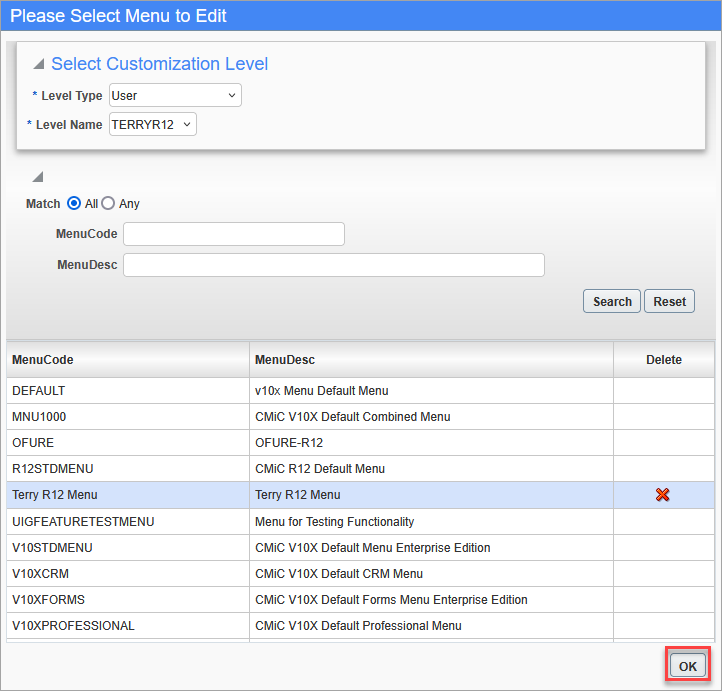
Launch the Treeview Builder and click the [Search] button to bring up a list of available Treeview menus.
-
Select the required Treeview menu and click [OK].
-
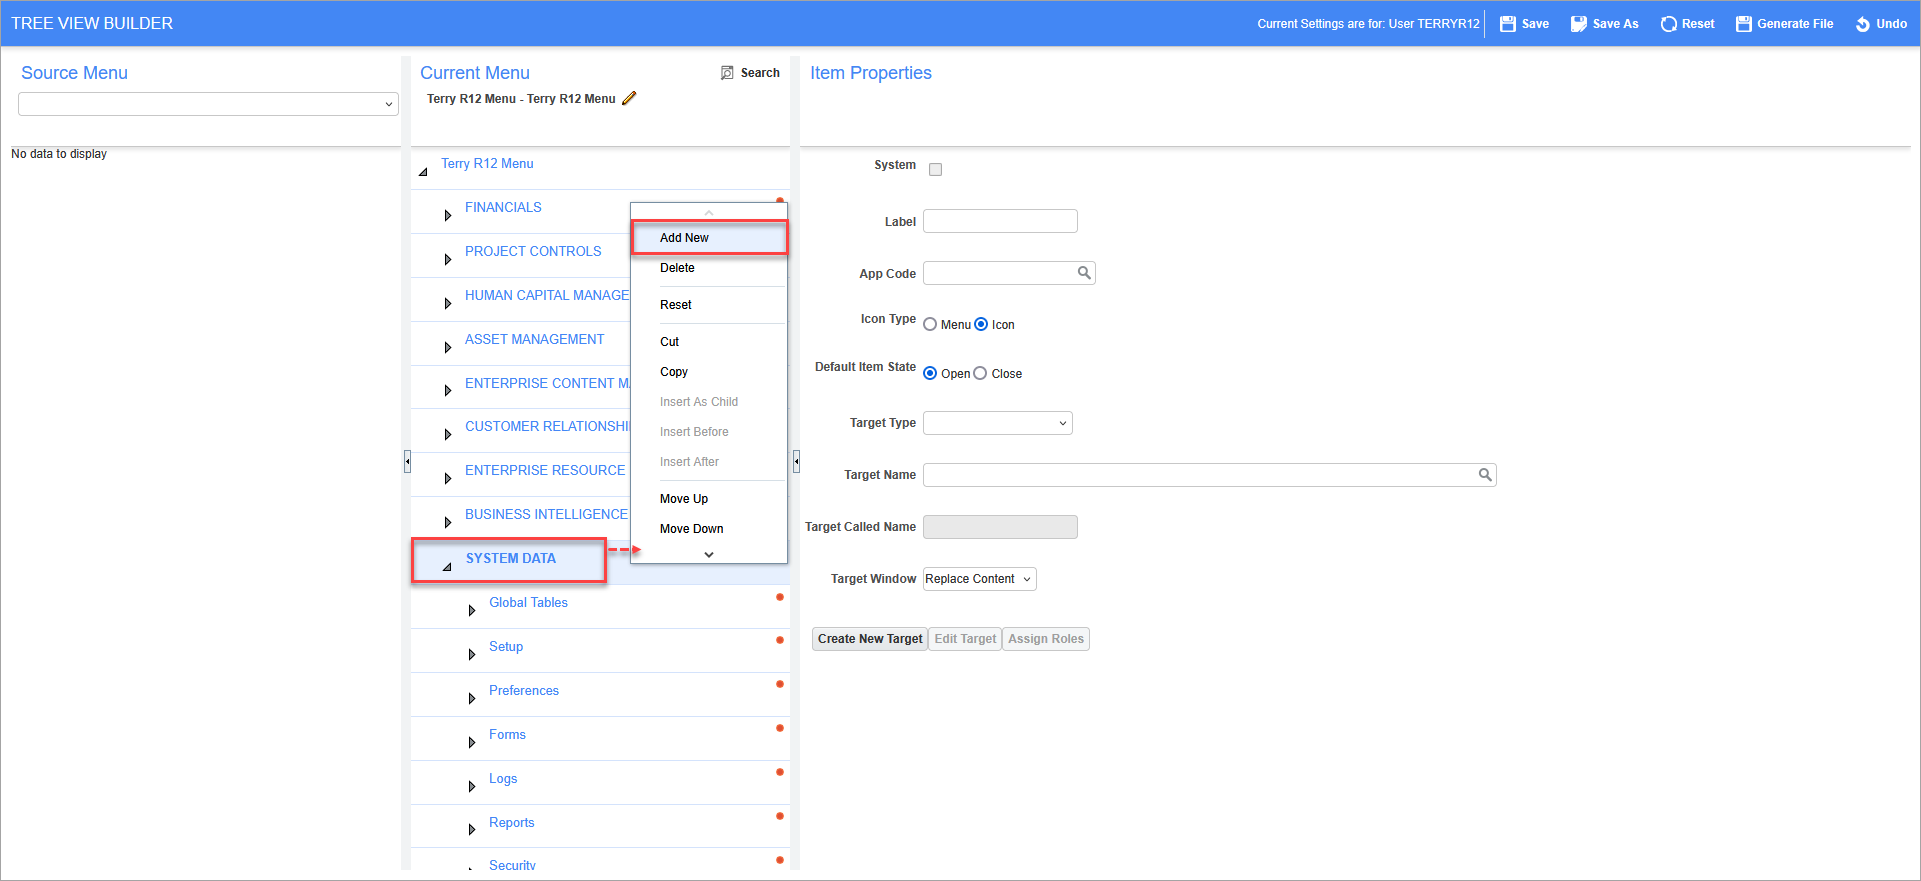
Right-click the System Data menu option and select "Add New" from the drop-down menu.
-
Enter the following values for the corresponding fields in the Item Properties section:
-
Label: User Admin Central
-
App Code: SD
-
Icon Type: Icon
-
Default Item State: Close
-
Target Type: External URL
-
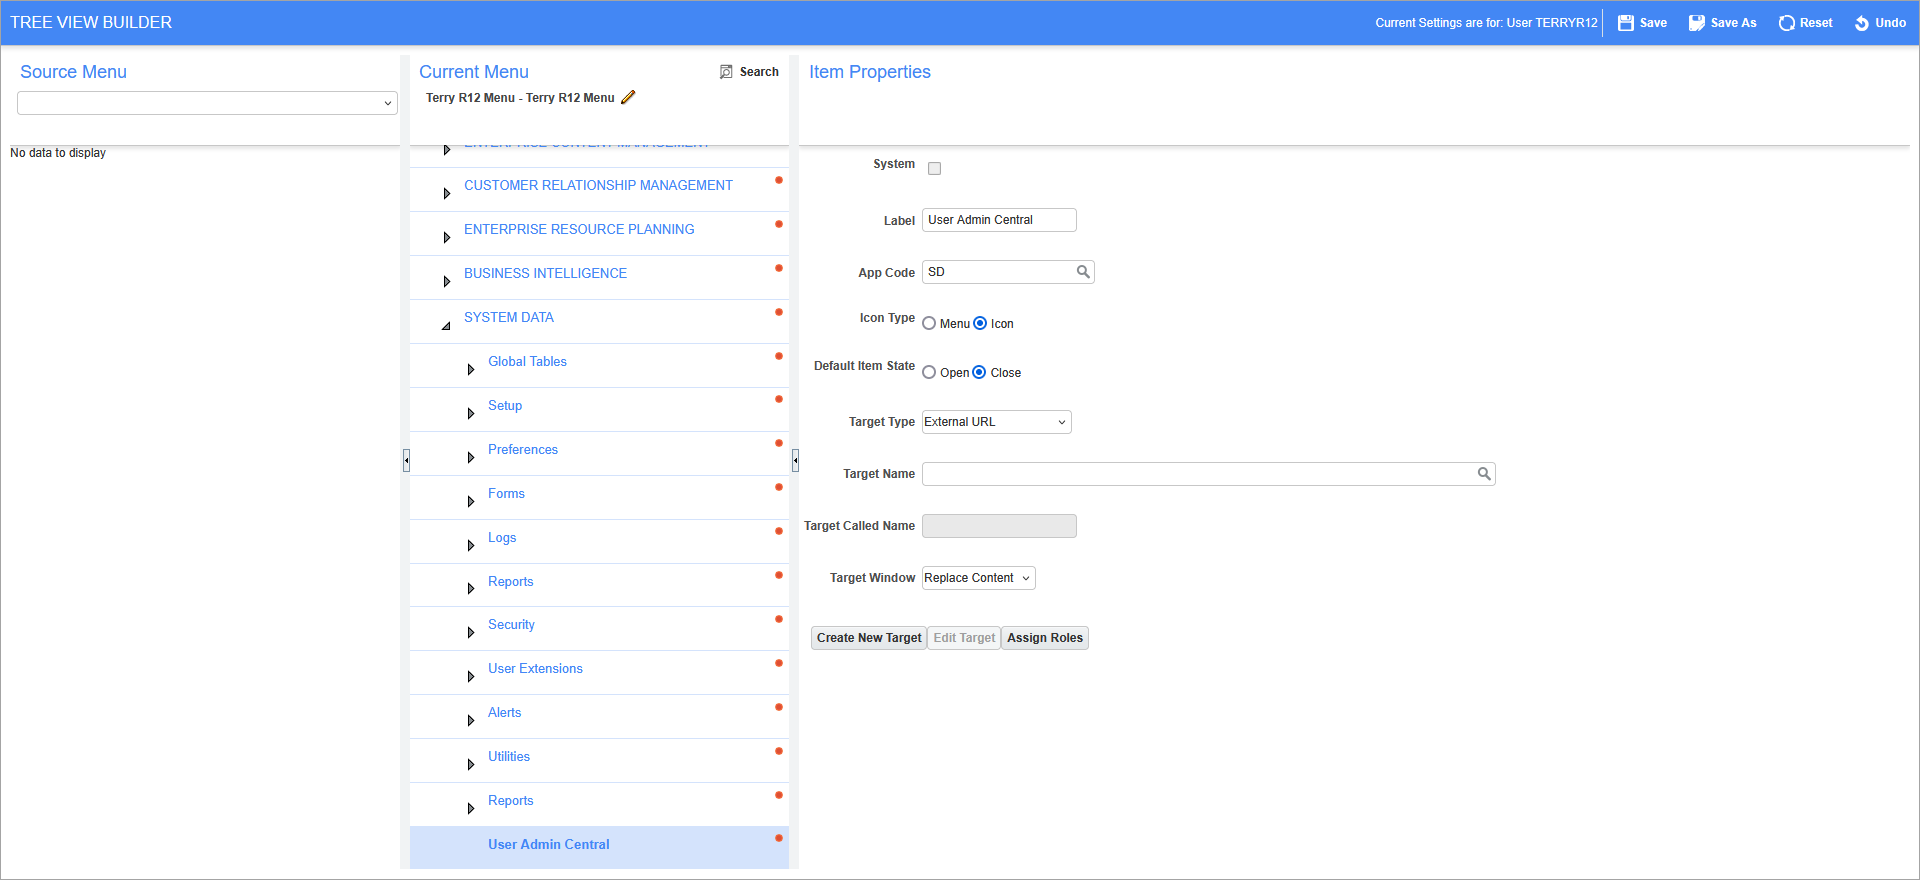
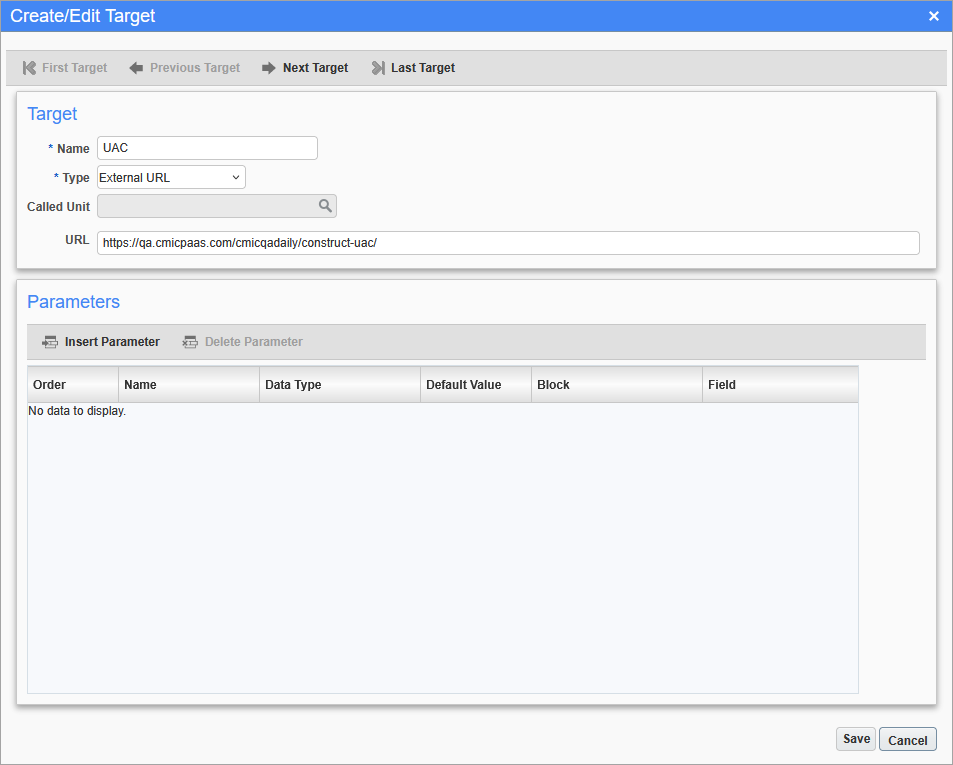
Click the [Create New Target] button to open the Create/Edit Target pop-up window, then enter the following details:
Click [Save] to save and close the pop-up window.
-
Select "UAC" for the Target Name field, then click [Save].
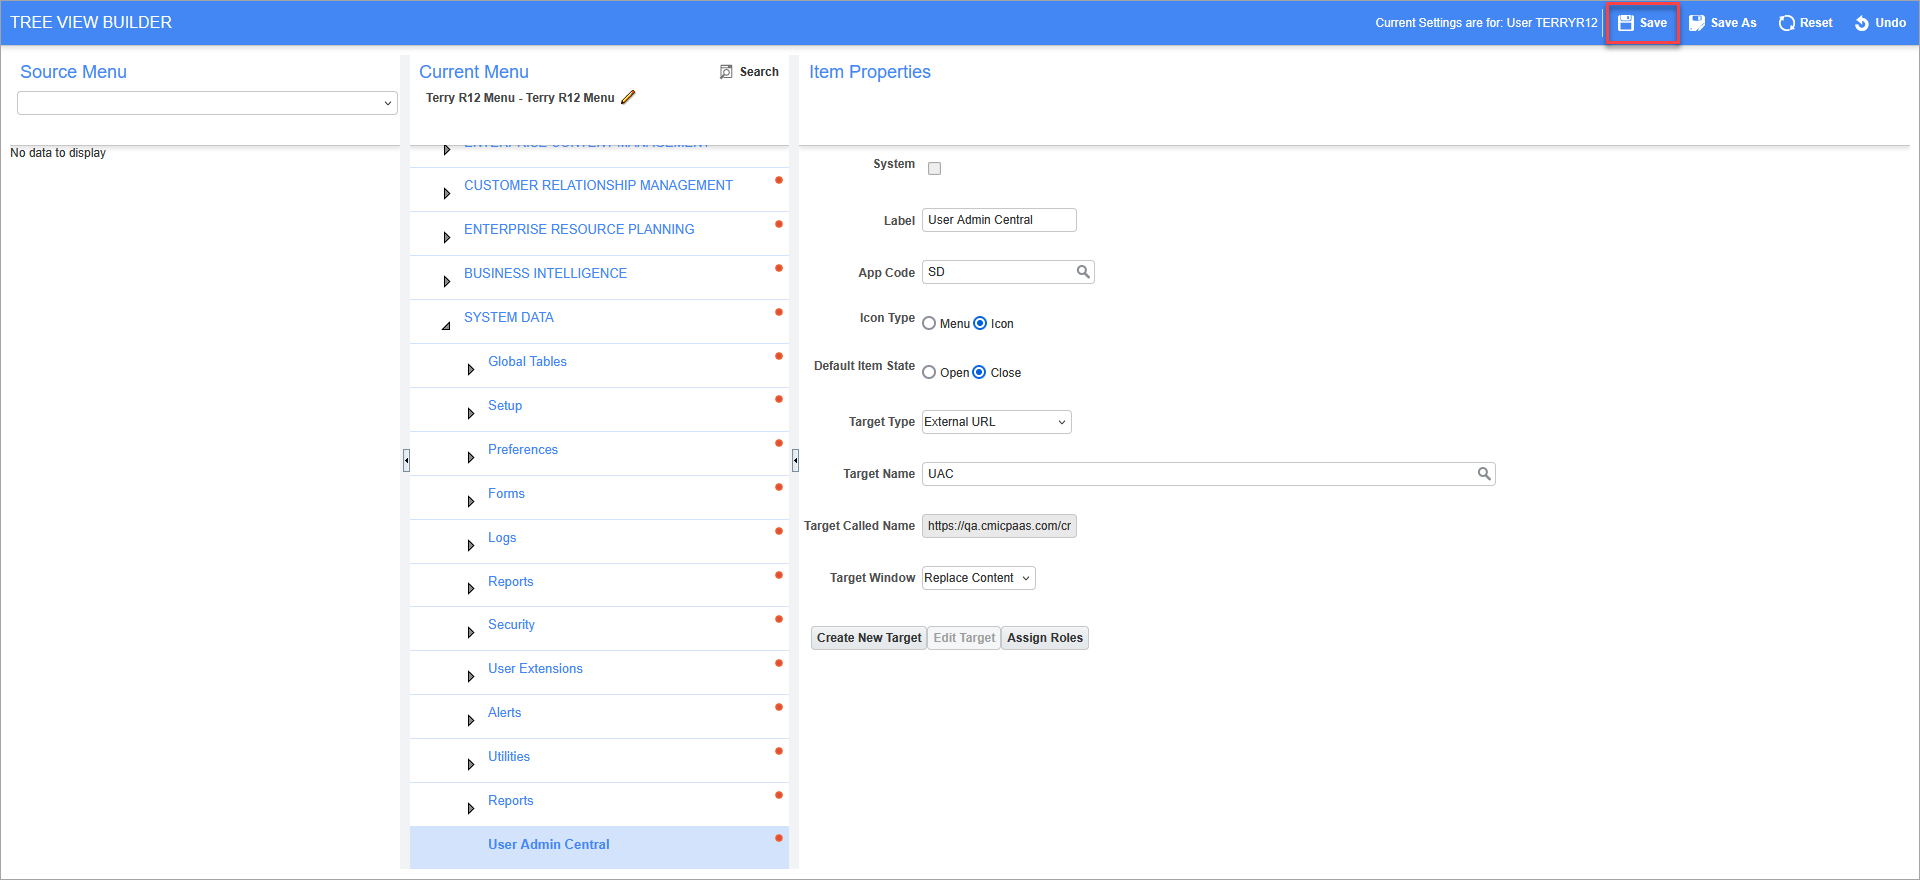
-
Launch the environment and navigate under the System Data Treeview menu to access UAC.
Core Features of UAC
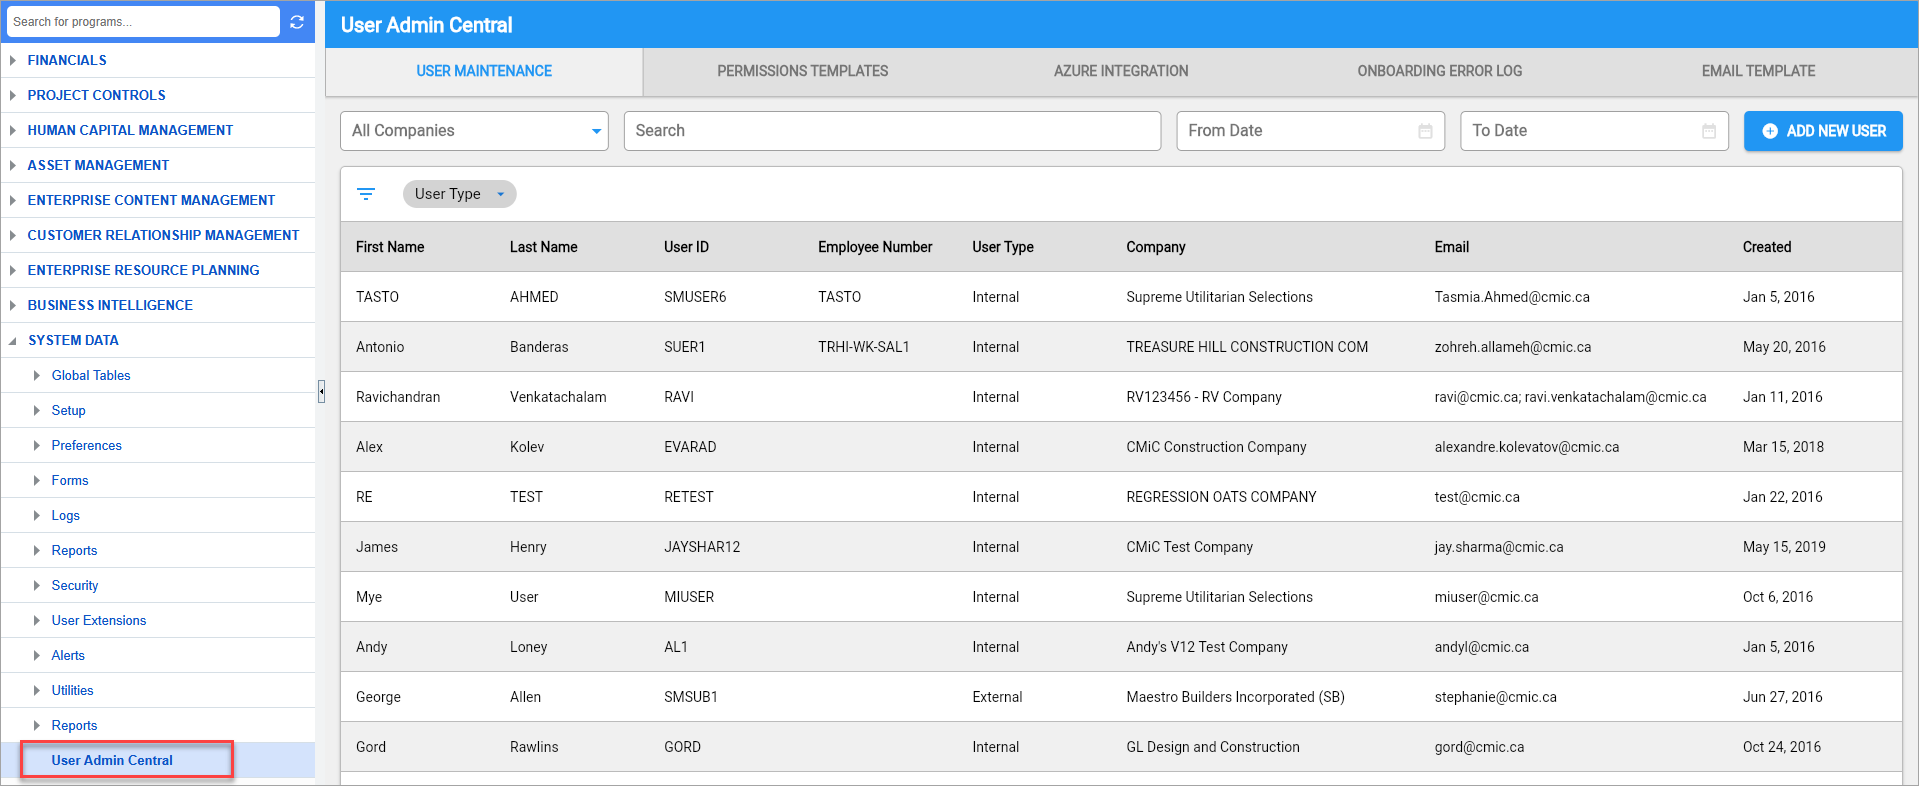
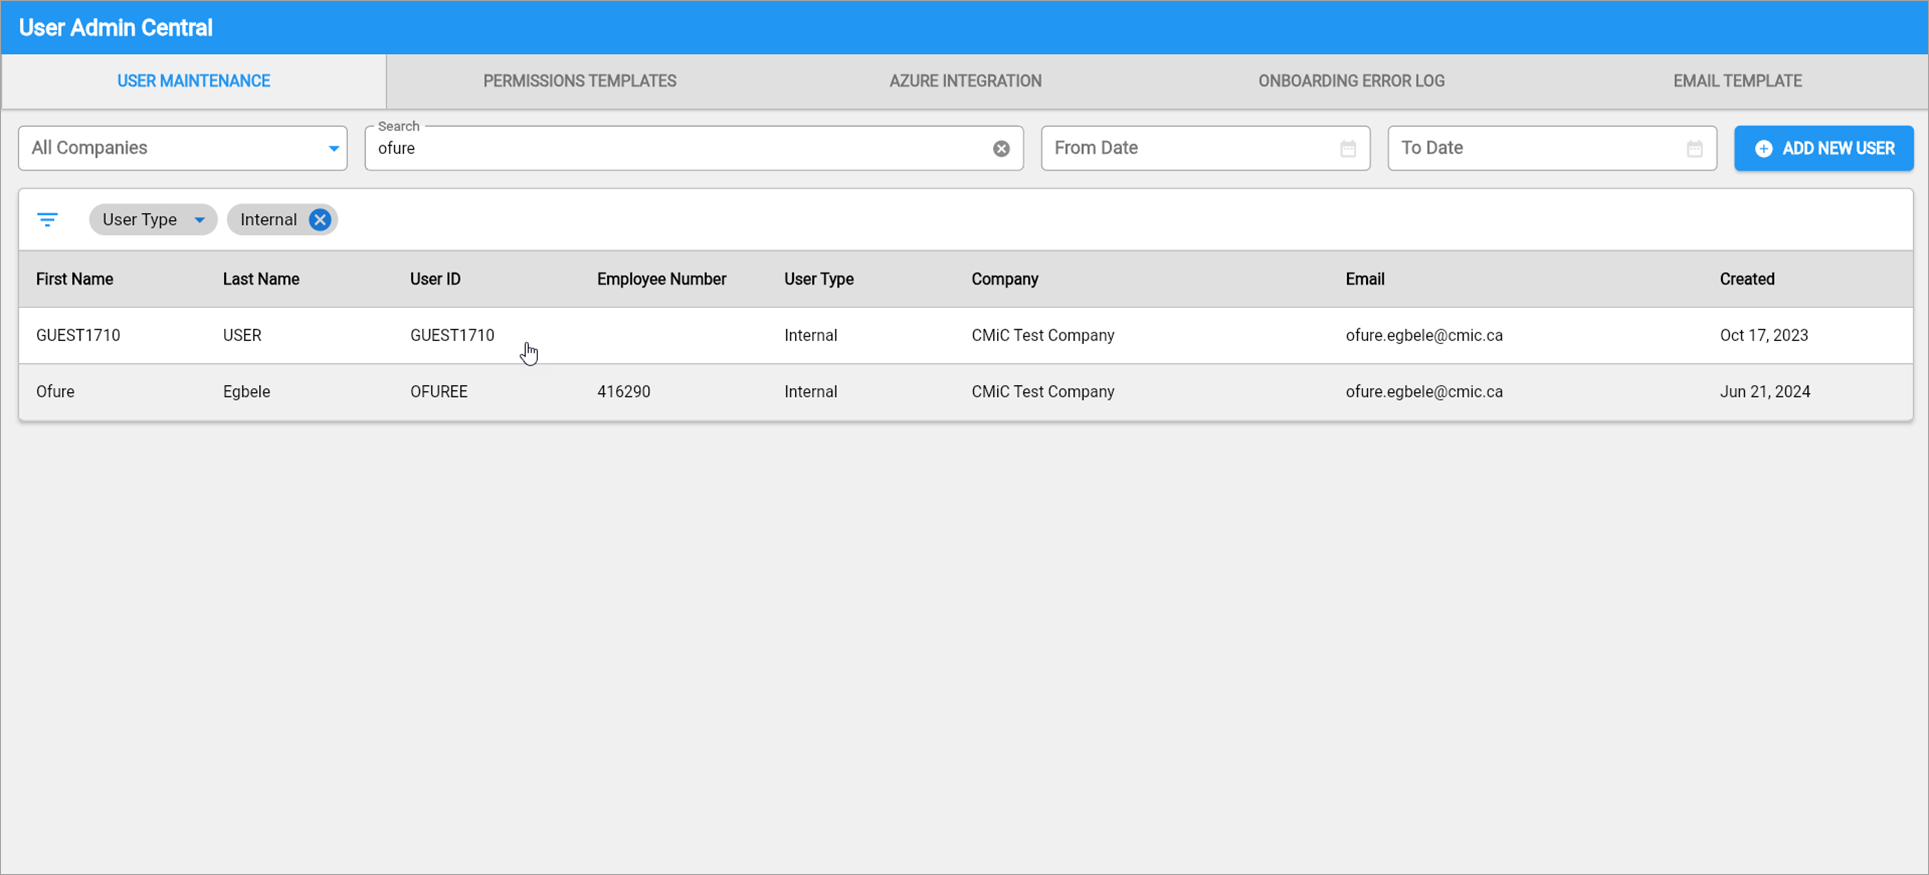
User Maintenance
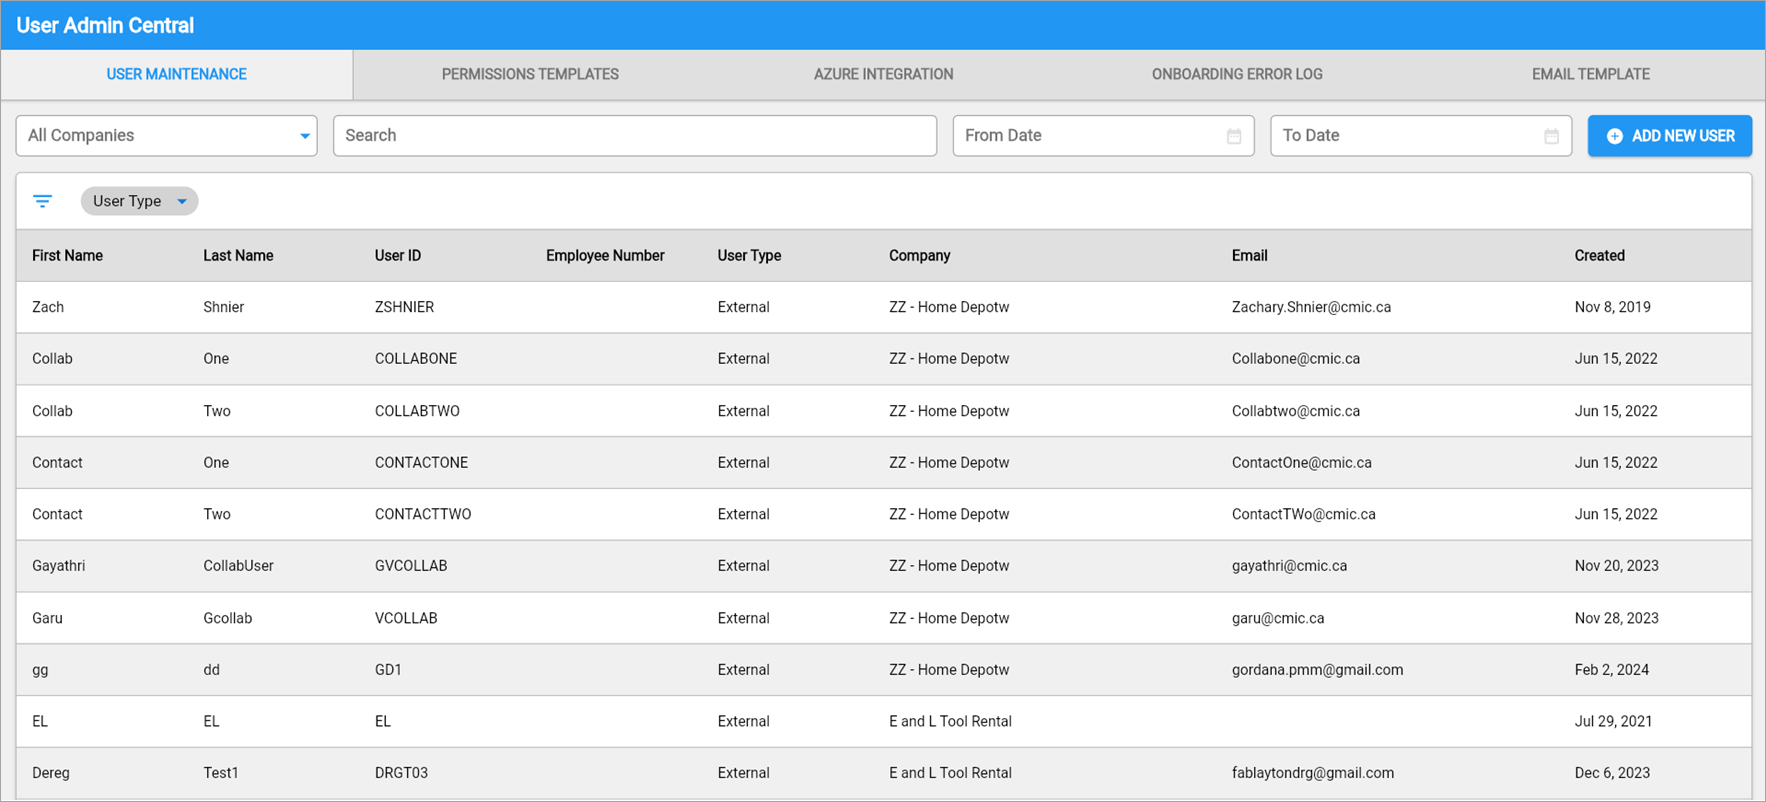
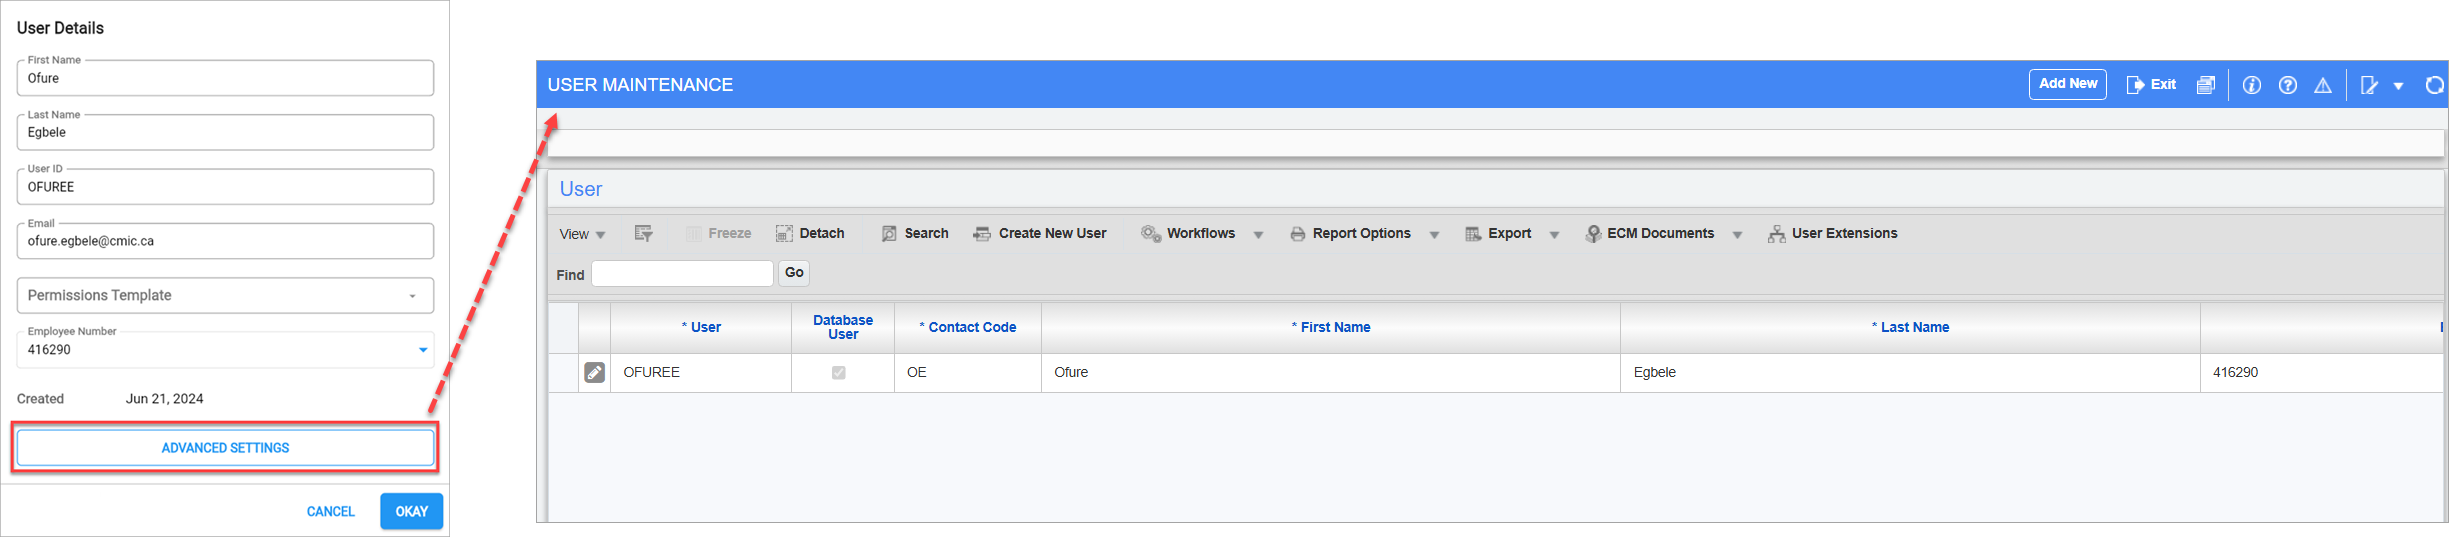
The User Maintenance tab contains a complete list of both internal and external users, including those synced directly from Azure. Admins have the flexibility to add new users here by clicking the [Add New User] button. From this screen, key user details, such as first name, last name, and email address, are all accessible. The Login User field allows the user to set an LDAP ID for their creation. This field is also present on Azure and will populate the value entered when created from that platform.
For more detailed configuration, the [Advanced Settings] button provides a direct link to the User Maintenance screen in the System Data module. This button is only available for users with the "Internal" user type.
Plus, to streamline navigation, there’s a search field to quickly locate specific user records.
Permissions Template
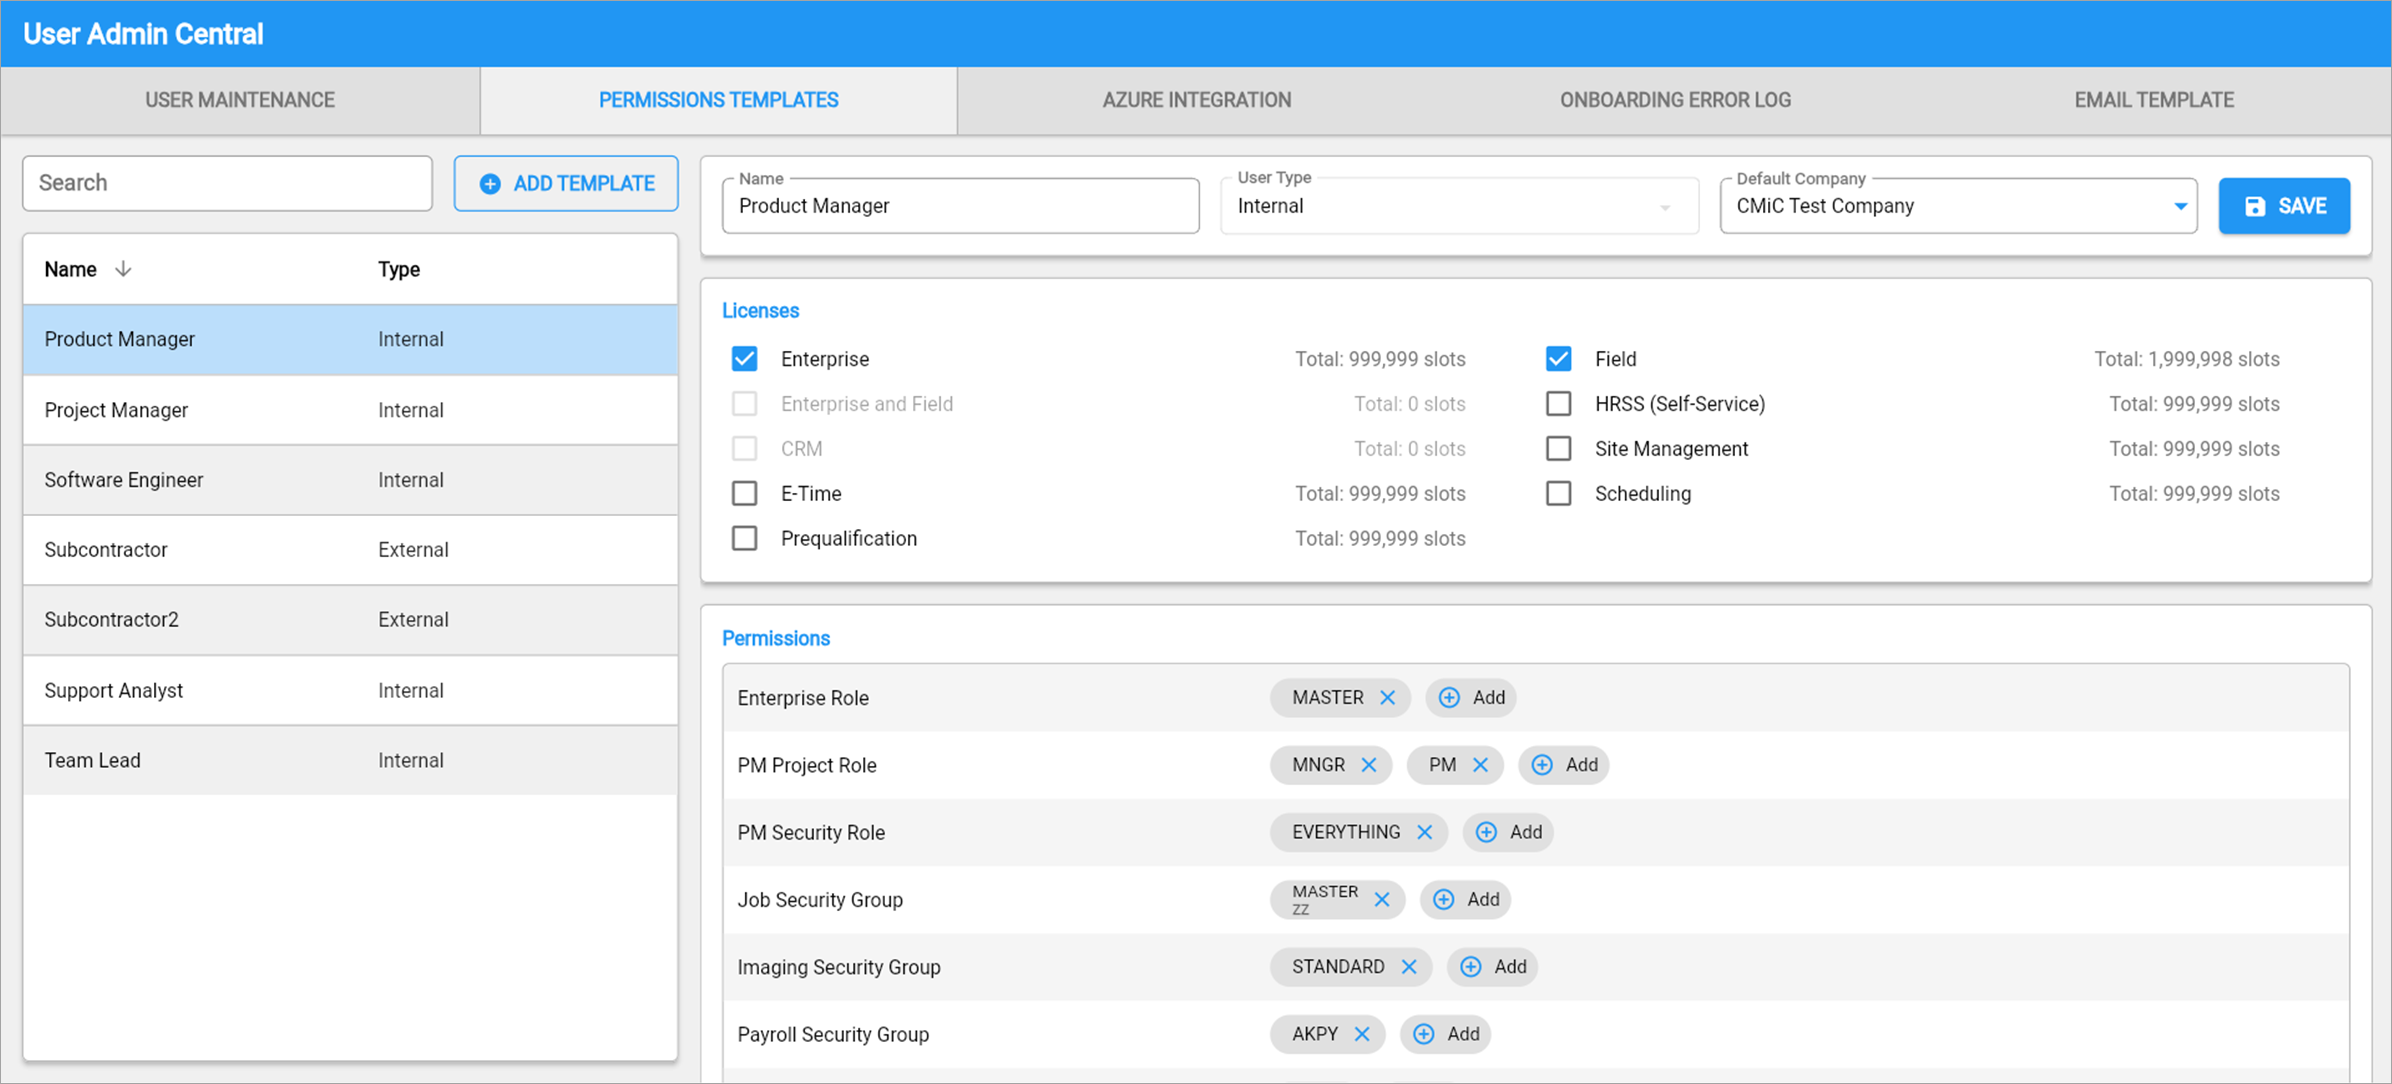
The Permissions Template tab brings efficiency to role-based access. Admins can create templates tailored to specific job titles. For example, a Product Manager template can be created with the right licenses, permissions, and securities. Whenever a user with the PM role is synced from Azure, they are automatically provisioned with everything defined in this template. These templates are flexible and can be updated as needed. Each user is linked to only one template, so if they switch roles, any permissions not included in the new template are automatically removed, keeping access secure and up to date.
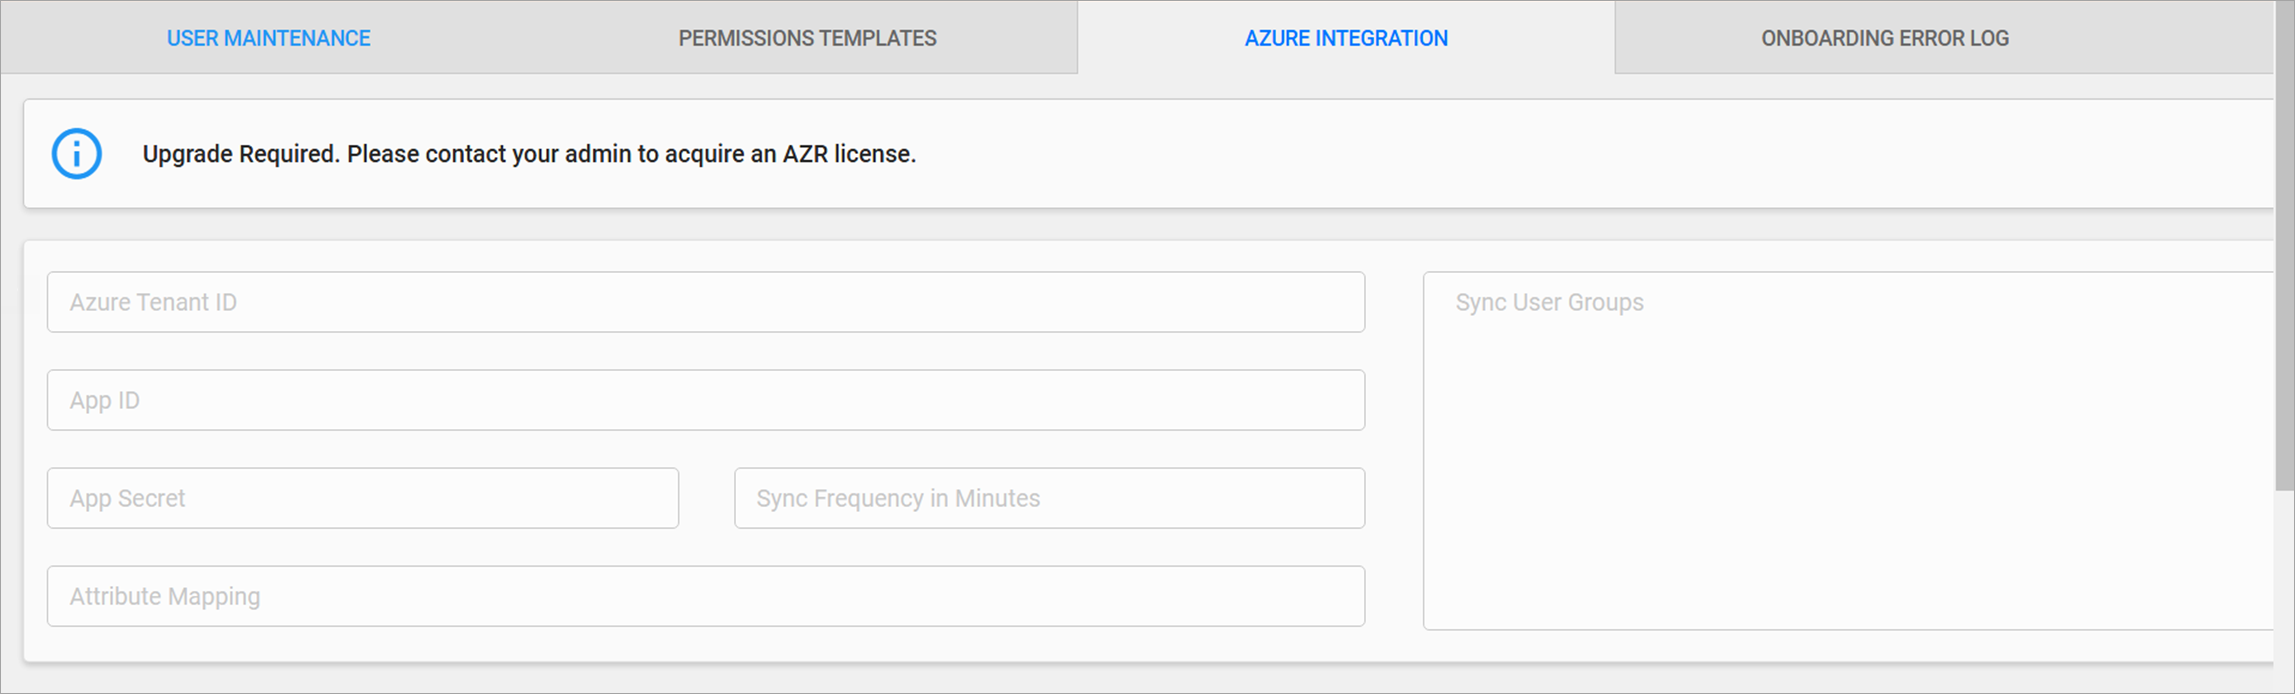
Azure Integration
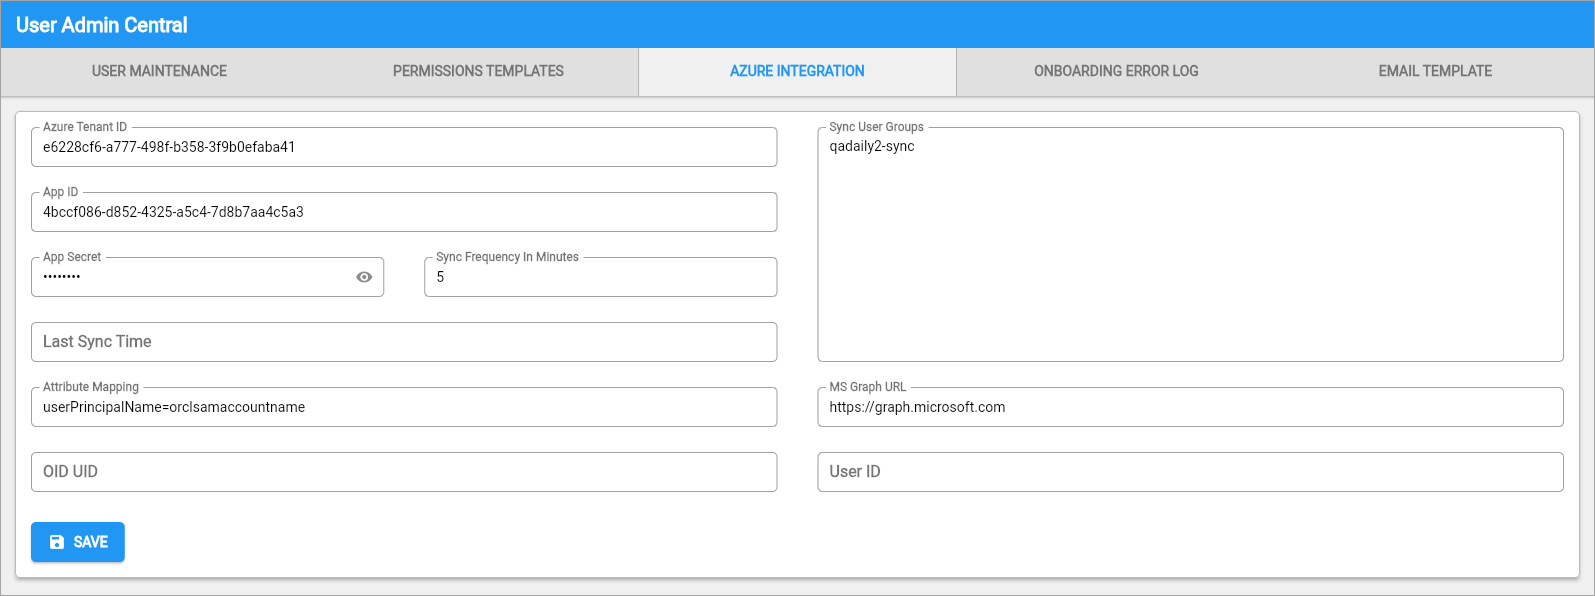
The Azure Integration tab connects with Azure to sync users to CMiC based on tenant attributes like Tenant ID and App ID. The integration supports seamless updates, syncing at scheduled intervals (Frequency settings & Last Sync Time).
The sync isn’t enabled by default. It needs to be managed on a single WebLogic server in your farm, which DBAs handle. Lastly, the Attribute Mapping field is used for SSO configuration, ensuring that Azure AD’s OID is mapped as the unique identifier to match users in CMiC, preventing duplicate entries and maintaining consistent user profiles.
User Creation and Sync Process
In the sync workflow, users are created in Azure, then added to Sync Groups, and synced into CMiC through scheduled pulls. CMiC generates the necessary OID for seamless sign-in and syncs user attributes based on mapped fields.
The following describes the fields available on this screen.
Azure Tenant ID
This is a required field and the unique identifier for your organization’s Azure Active Directory.
The ID format is "XXXXXXXX-XXXX-XXXX-XXXX-XXXXXXXXXXXX".
App ID
This is a required field and the Application (client) ID registered in Azure that represents the CMiC integration app. Users can find this in their Azure App Registrations under “Application (client) ID”.
App Secret
This is a required field and the client secret generated for the App ID to authenticate securely.
NOTE: Treat this like a password. Keep it secure.
Sync Frequency in Minutes
How often the sync job should run to fetch user updates from Azure. The default value for this field is "5" and only allows positive integers.
Last Sync Time
This is a system generated field and is not editable. It shows the last date and time the sync job successfully ran.
Attribute Mapping
This is specific to the mapping between OAM and OID, which is the SAML claim used to lookup the LDAP entry. It's not the key attribute for an LDAP entry. For example, userPrincipalName=orclsamaccountname.
Sync User Groups
The Azure group whose users should be synced to CMiC, e.g. qadaily-sync.
MS Graph URL
The base URL for Microsoft Graph API. The default value is "https://graph.microsoft.com". If multiple groups are needed, users can enter multiple groups separated by commas.
OID UID
This field specifies the Azure field that will be used to generate the Login User (LDAP) in CMiC when a user is being created, e.g. userPrincipalName. This allows Azure to properly sync the values when creating a user on their platform.
User ID
This field specifies the Azure field that will be used to generate the CMiC User ID (Sec User), e.g. employeeId. This allows Azure to properly sync the values when creating a user on their platform.
NOTE: This must match a valid, populated attribute in Azure.
Onboarding Error Log
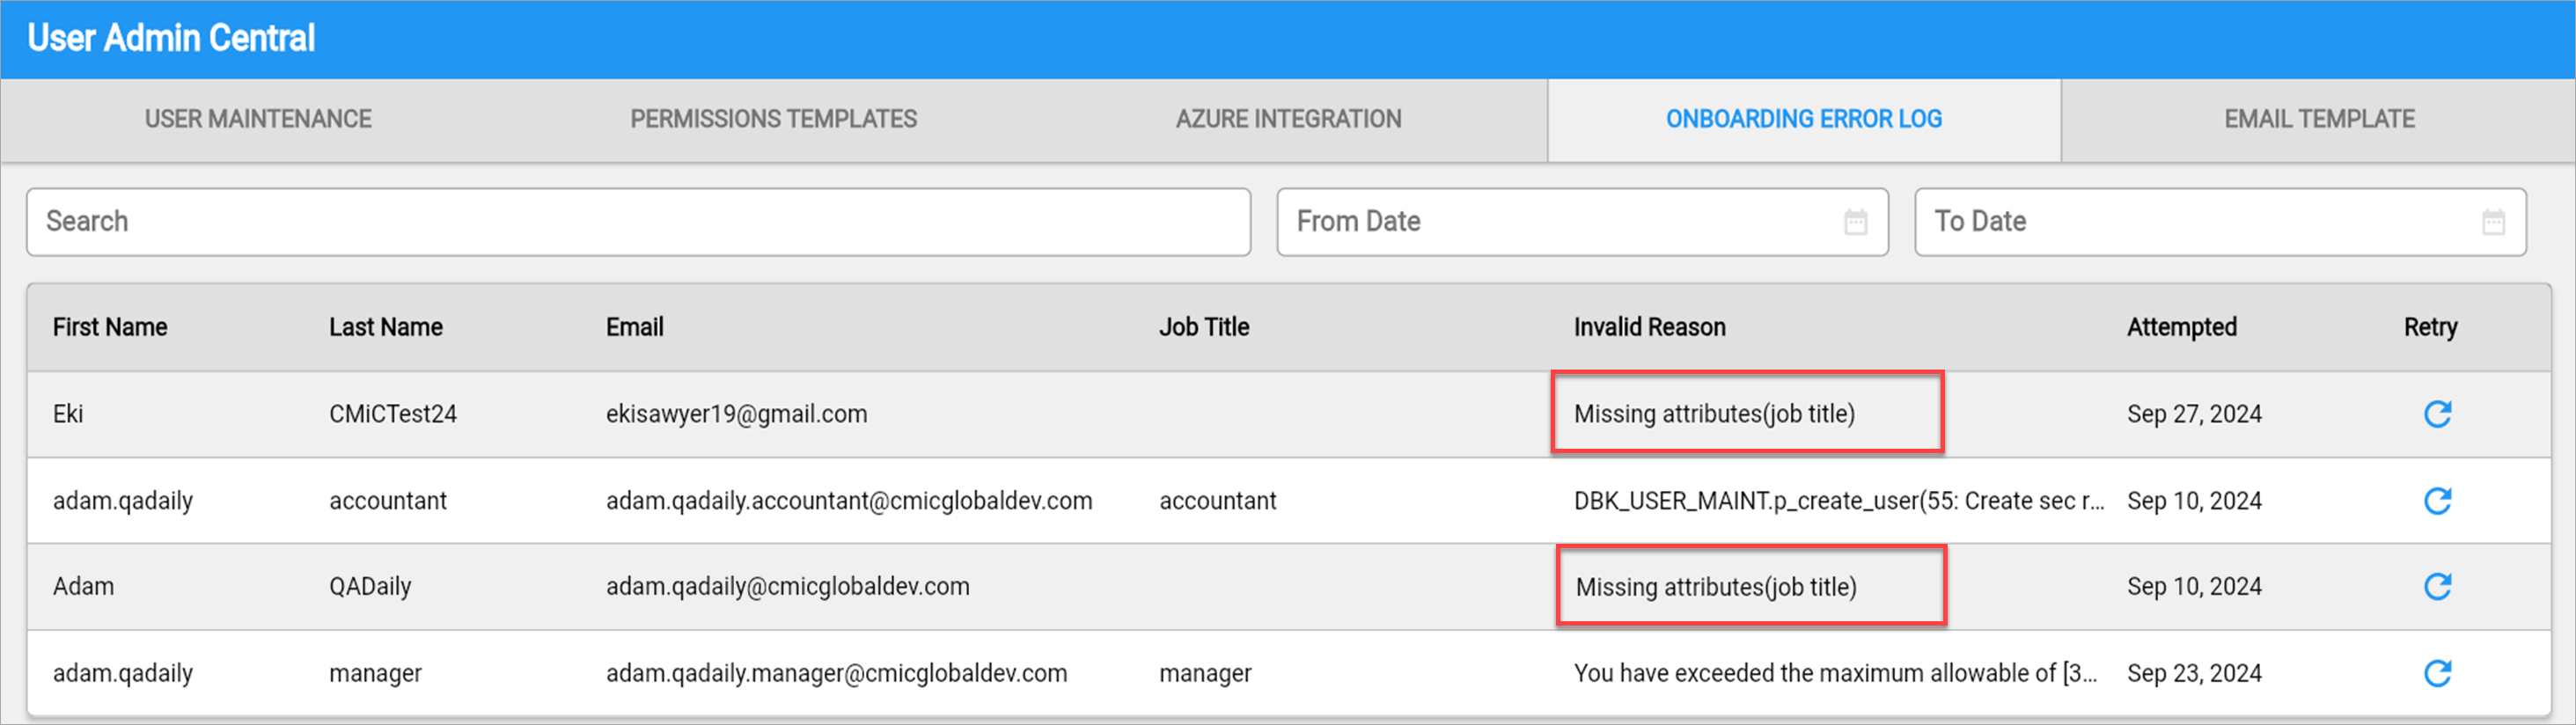
With Azure Integration in place, the Onboarding Error Log tab becomes a helpful tool for troubleshooting. If the AZR license isn’t available, this screen will be inactive. When the AZR license is in place this log captures sync errors, allowing Admins to correct records in Azure or directly in UAC. If errors persist, they remain visible for further troubleshooting. The Login User and User ID fields allow the user to view more mandatory Azure sync fields on the error log for created users.
Email Templates
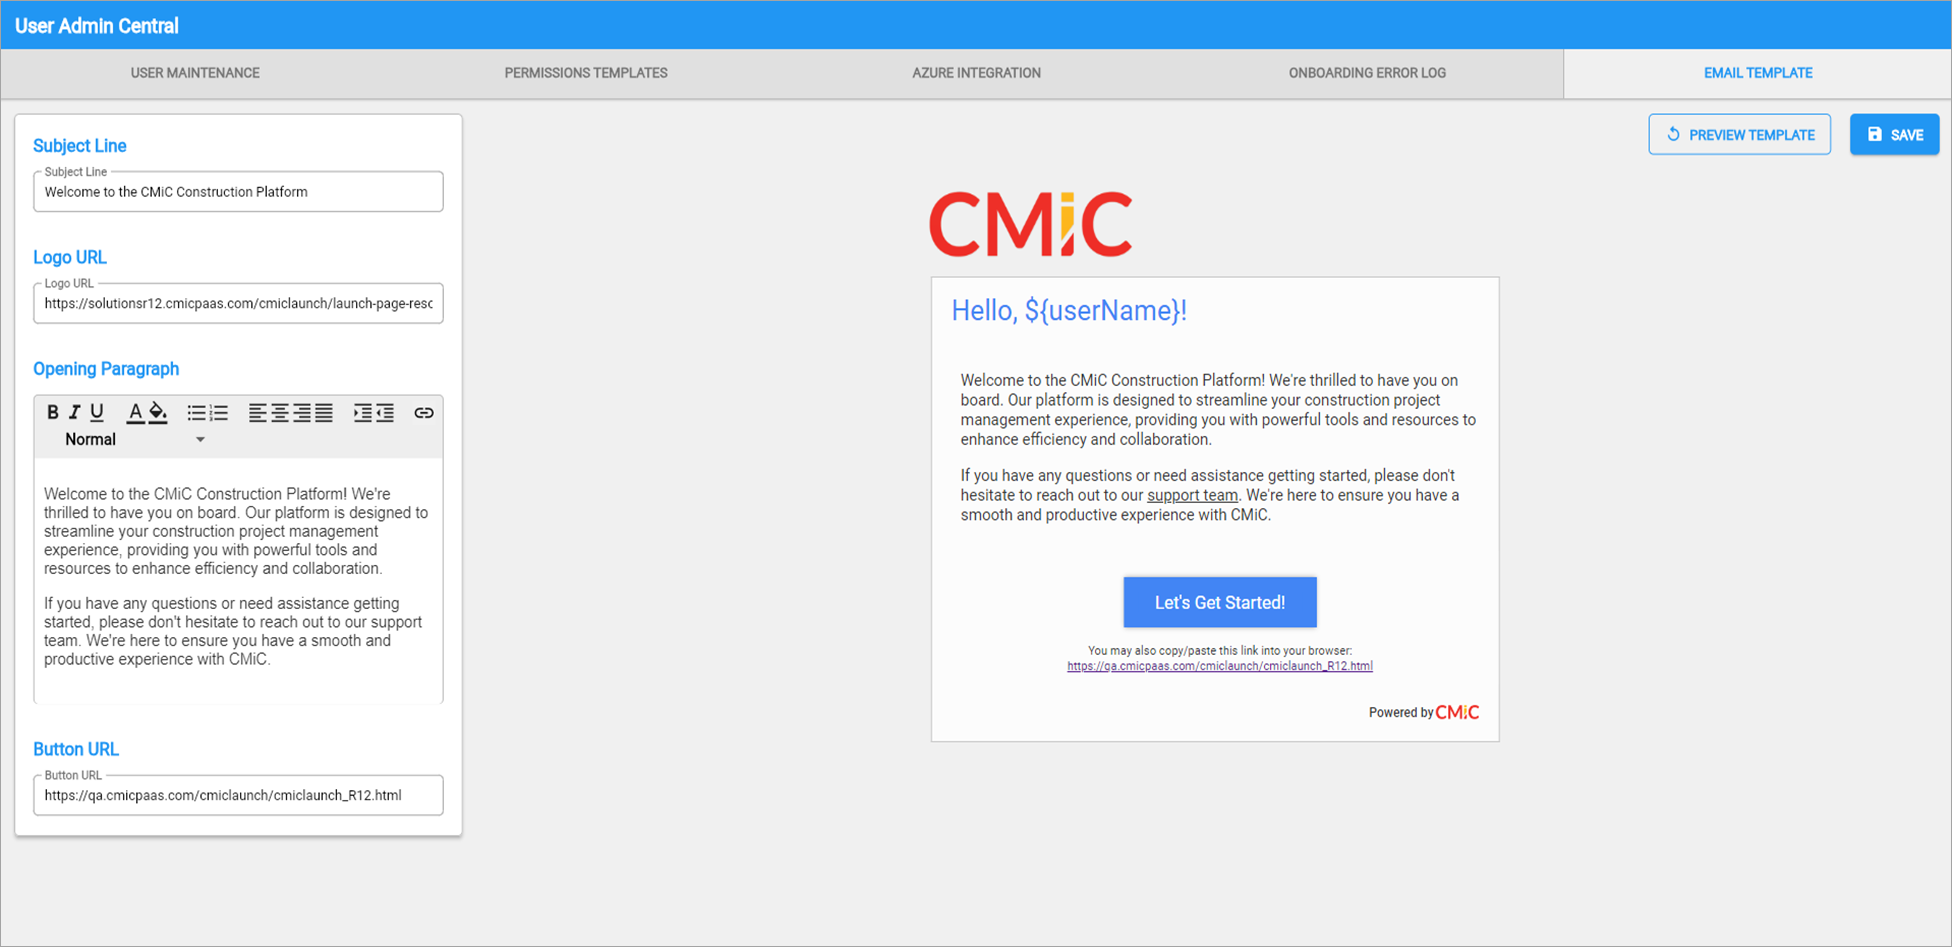
Once a new user is successfully set up in CMiC, the next step is making sure they get the right welcome and onboarding information. Email templates provide a customizable experience for new users, ensuring clear, consistent onboarding messages. Admins can preview messages for accuracy and professional tone.
User Creation and Error Handling Process
-
User Creation with Mandatory Fields: If all mandatory fields (first name, last name, job title, and email) are provided, the user is successfully created and a welcome email is sent to the user.
-
Error Logging for Missing Fields: If any mandatory field is missing, the failed record is logged in the Onboarding Error Log.
-
System Admin Intervention: The admin can correct the errors in Azure and retry the function from the error log or correct the record on the Onboarding Error Log.
-
Successful Update: If the update is successful, the user is created and the record is cleared from the log.
-
Persistent Errors: If the error persists, the record remains in the log and displays the new error message.