Pgm: BABANKAC – Bank Account Maintenance; standard Treeview path: System > Global Tables > Banking > Bank Account
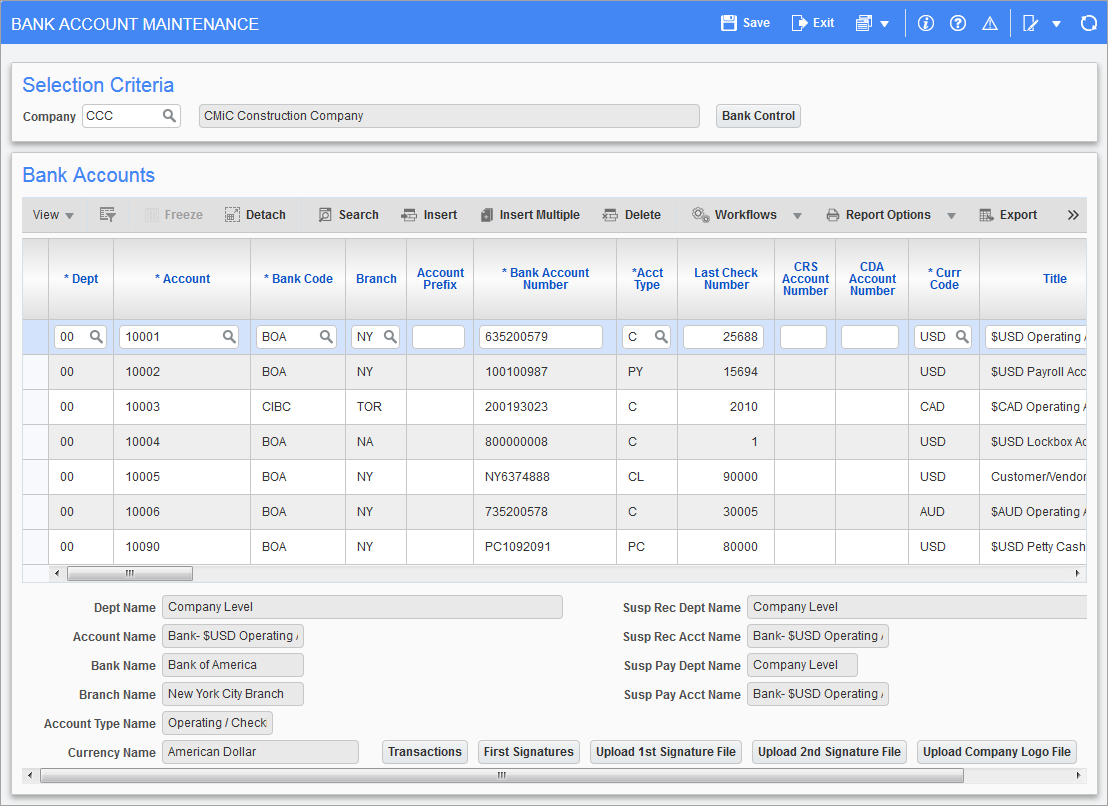
The Bank Account Maintenance screen is used to enter the bank accounts used by the different companies within the system. The bank accounts that are defined within this screen are used for the processing of cash receipts, cash payment as well as payroll transactions. Bank accounts are based on specific General Ledger accounts. For this reason, bank accounts must be assigned a unique General Ledger account.
The account number consists of 3 distinct parts; the bank code, a prefix or transit number, and the bank account number itself. The bank code and bank account numbers are mandatory fields. Each bank account is designated with a currency which will default to the currency of the company in which it belongs.
Three additional GL accounts will be associated with each bank account. One account will be used for foreign exchange gain amounts, the second account will be used for foreign exchange loss amounts, and the third account will be used as a suspense account for posting variances during the processing of bank statements.
Company
Enter/select the company code to which the bank accounts being defined belong.
Dept, Account
Enter/select the department and General Ledger account to be associated with the bank account being defined.
Bank Code
Enter/select the bank code for the bank to be associated with the bank account being defined.
Branch, Account Prefix
Enter a bank prefix and branch as applicable.
Bank Account Number
Enter the bank account number associated with the bank account being defined.
Acct Type
Enter/select the bank account type associated with the bank account being defined.
Last Check Number
Enter the last check number used for this bank account. The system will use this to determine the next check number to use.
CRS Account Number, CDA Account Number
If CRS and CDA numbers are used when sending electronic files to the bank, enter them here.
Curr Code
Enter/select the currency code associated with the bank account being defined.
Title
Enter the bank account title associated with the bank account being defined.
Transit
Enter the bank transit number in this field.
Routing A, Routing B
If required, enter routing A and B codes.
Customer ID
Enter the bank customer ID.
Check Date Format
Select the format to be used for the check date. The selected format is used with specific check formats (in Canada those marked with CPA-006) to display the date in the specified format when printed by any user.
PosPay Cust Id
Enter the Customer ID for Positive Pay File.
Susp Rec Dept Code
Enter/select the suspense payment department code.
Susp Pay Acct Code
Enter/select the suspense payment account code.
Third Party Check File Format
Select the file format for third-party checks.
EFT File Format
Select the file format for EFT file.
EFT File Code
Enter the EFT file code.
1st Signature File Name

Example of AP check with default logo and signature images defined
As shown in the sample check above, a default company logo and first and second signatures can be set to print on AP checks.
The 1st Signature File Name field is used to enter a file path to associate a single 1st Signature image to the account. Alternatively, the [Upload 1st Signature File] button on this screen can be used to browse for and select a signature to upload and the image’s file path will automatically be displayed in the 1st Signature File Name field.
If the 1st Signature File Name field is used, the ‘Select First Signature Name During Check Printing Process’ checkbox in this row must be unchecked, as this checkbox indicates that multiple 1st Signature images are specified via the [First Signatures] button on the bottom of the screen.
2nd Signature File Name
Enter the file path of 2nd Signature image to be printed on AP checks.
Alternatively, the [Upload 2nd Signature File] button on this screen can be used to browse for and select a signature image to upload and the image’s file path will automatically be displayed in the 2nd Signature File Name field.
Company Logo File
Enter file path to the company logo to print on AP checks.
Alternatively, the [Upload Company Logo File] button can be used to browse for and select an image of a logo to upload and the image’s file path will automatically be displayed in the Company Logo File field.
Pay Through
Enter payable through text.
Currency Designation
Enter currency designation.
Amt For Two Signatures
If an amount is entered in this field, two signatures are required if the payment amount is greater than this amount.
Amt For Manual Signature
If an amount is entered in this field, a manual signature is required if the payment amount is greater than this amount.
Comp Alternate Address Code
Enter/select alternate address for company. Address codes are defined on the Address Codes screen (standard Treeview path: System > Global Tables > Address Code).
Print Company Address – Checkbox
If checked, company’s address is printed on checks.
Print Bank Address – Checkbox
If checked, bank’s address is printed on checks.
Print Check Frame – Checkbox
If checked, a check frame is printed on checks.
Print Routing – Checkbox
If checked, routing code is printed on checks.
Print MICR – Checkbox
If checked, transit/MICR code is printed on checks.
Select First Signature Name During Check Printing Process – Checkbox
If checked, instead of using this account’s 1st Signature File Name field to specify the path to the 1st Signature image, the [First Signatures] button is used to specify paths to multiple 1st Signature images.
If checked and multiple paths to 1st Signature images are entered for the account, and if the ‘Use Voucher Bank Acc’ box is unchecked in the Print Checks screen (standard Treeview path: Accounts Payable > Check > Print Checks), the First Signature Name field in the Print Checks screen will contain an LOV of the 1st Signature images.
File Number
Enter file number for pay deposit file.
File Sequence
By default, this field is hidden but can be displayed using Lite Editor. The field contains a [File Sequence] button, which is enabled when the Customer ID field on this screen is populated. Pressing the button launches a pop-up window, which is used to update the file sequence number. The file sequence number is set to "0" by default. If this feature is being used, when the company's EFT file is generated through Payroll, the file sequence number will appear as "0001" in the file. When generating for the next period or next attempt, the sequence number will be updated to “0002”. The file sequence number can be updated in the File Sequence field as required. For example, if the value in the File Sequence field is updated to "503", when the EFT file is generated through Payroll, the file sequence number will appear as "0504" in the file.
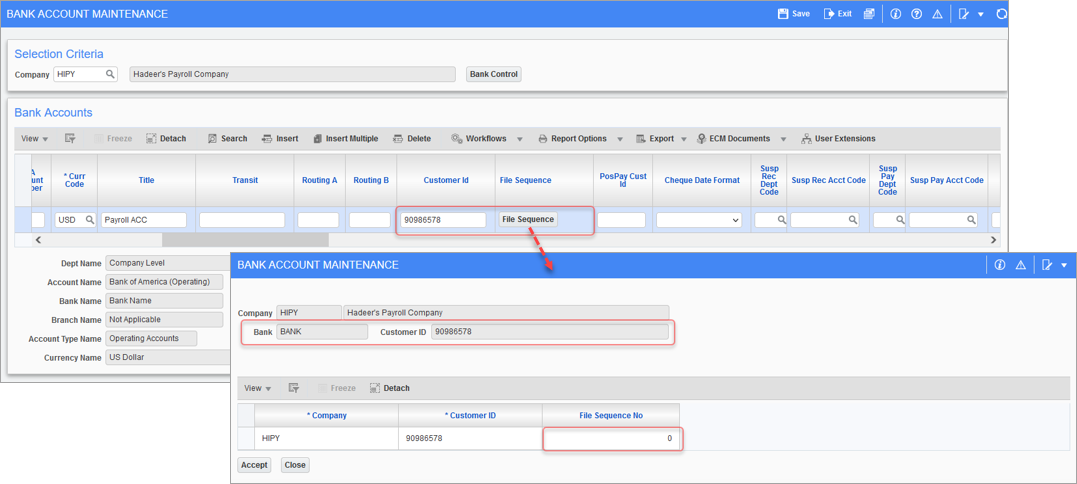
IBAN Number
Enter the account’s International Bank Account Number.
[Transactions] – Button
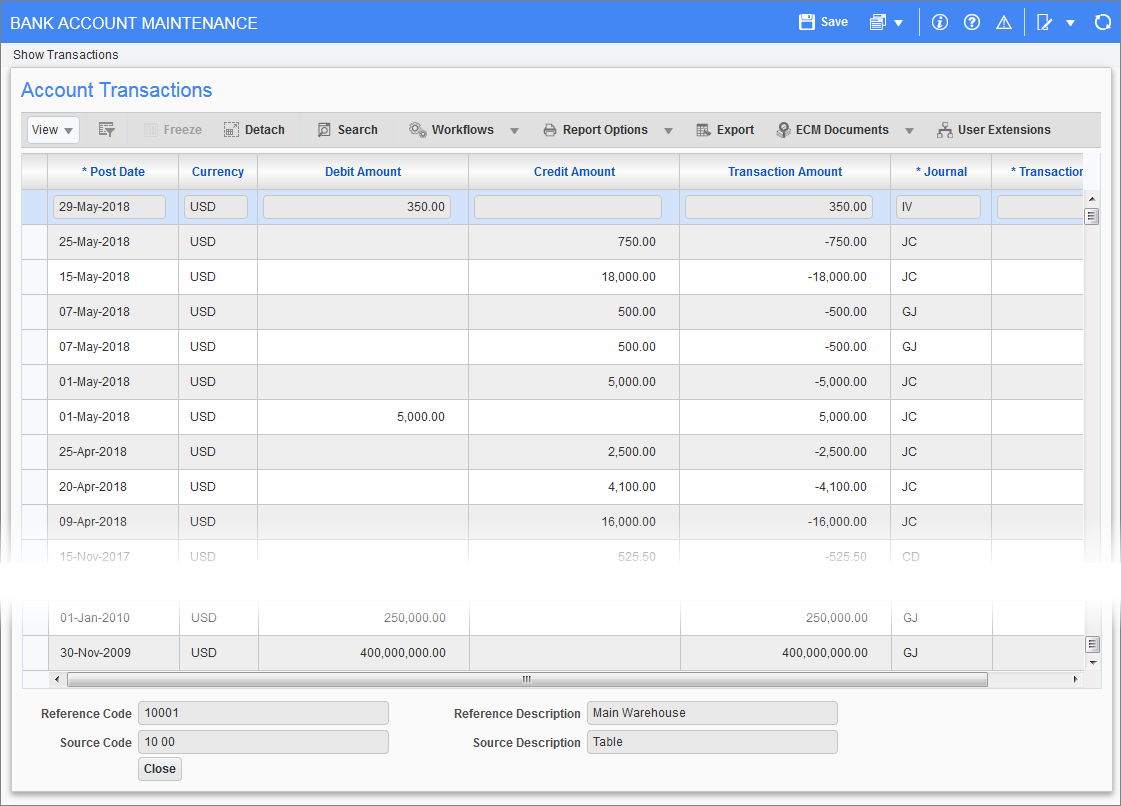
Pop-up window launched from [Transactions] button on the Bank Account Maintenance screen; standard Treeview path: System > Global Tables > Banking > Bank Account
This pop-up displays the selected account’s transactions. This screen is for display purposes only, and to export its data via the [Export] button on the Block Toolbar.
[First Signatures] – Button
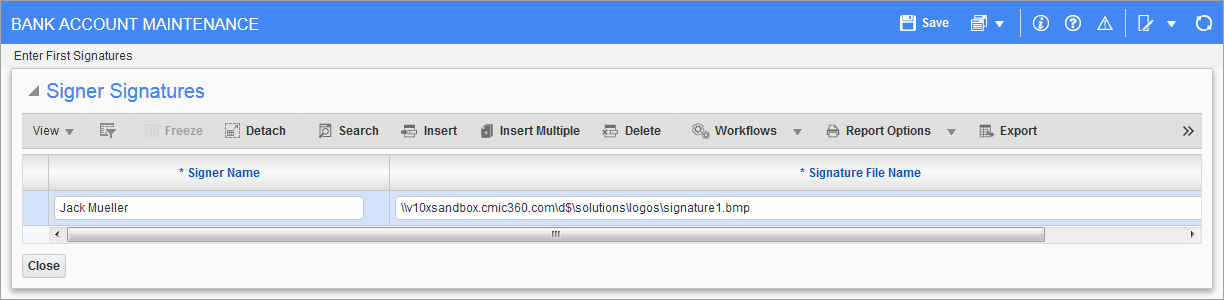
Pop-up window launched from [First Signatures] button on the Bank Account Maintenance screen; standard Treeview path: System > Global Tables > Banking > Bank Account
If an account’s ‘Select First Signature Name During Check Printing Process’ checkbox is checked, instead of using this account’s 1st Signature File Name field to specify the path to the 1st Signature image, the [First Signatures] button is used to specify paths to multiple 1st Signature images.
Then, if the ‘Use Voucher Bank Acc’ box is unchecked in the Print Checks screen (standard Treeview path: Accounts Payable > Check > Print Checks), the First Signature Name field in the Print Checks screen will contain an LOV of the 1st Signature images entered via this pop-up window.
[Upload 1st Signature File] – Button
Pop-up window launched from [Upload 1st Signature File] button on the Bank Account Maintenance screen; standard Treeview path: System > Global Tables > Banking > Bank Account
This button launches a pop-up to browse for and select an image of a signature for uploading. This signature will be used as the 1st Signature for the signing of AP checks debited against the selected account.
Alternatively, the file may be dragged and dropped into area with the caption “or drop files here”.
The selected image file’s path will be displayed under the 1st Signature File Name column for the selected account.
[Upload 2nd Signature File] – Button
Pop-up window launched from [Upload 2nd Signature File] button on the Bank Account Maintenance screen; standard Treeview path: System > Global Tables > Banking > Bank Account
This button launches a pop-up to browse for and select an image of a signature for uploading. This signature will be used as the 2nd Signature for the signing of AP checks debited against the selected account.
Alternatively, the file may be dragged and dropped into area with the caption “or drop files here”.
The selected image file’s path will be displayed under the 2nd Signature File Name column for the selected account.
[Upload Company Logo File] – Button
Pop-up window launched from [Upload Company Logo File] button on the Bank Account Maintenance screen; standard Treeview path: System > Global Tables > Banking > Bank Account
If your checks are not pre-printed and you want your company logo to print on the top left-hand side of the AP check, use this button to launch a pop-up to browse for and select an image of the logo for uploading.
Alternatively, the file may be dragged and dropped into area with the caption “or drop files here”.
The selected logo’s file path will be displayed under the Company Logo File column for the selected account.